We independently select these products—if you buy from one of our links, we may earn a commission.
At the beginning of quarantine, lots of us (myself included) were forced to figure out how to do our jobs from our homes. For many, that meant finding a comfy chair-and-desk combo. Maybe getting a better task light or improving a super-slow internet connection. For me, life at home meant figuring out how to make my kitchen more functional. See, as a food editor, my job includes cooking, writing, and styling recipes. And in mid-March, I realized that, with my family of four all at home in our Brooklyn apartment, our current kitchen setup was not going to cut it.
We have a relatively large kitchen for city standards, but living in Brooklyn means you have to put up with things. The only real available counter space was a 24-by-30-inch-sized space. If I happened to be working in the kitchen, no one else could really use the counter. Making things even worse, that little bit of counter space is not exactly level, which can be a pain when, say, rolling puff pastry. Also, we only have three drawers and limited cabinet space.
One thing going for us: The two OMAR kitchen racks we bought years ago from IKEA. One was used as a pantry and general home storage area, and the other held pots, pans, bakeware, cooking oils, appliances, silverware, and a cheap microwave that hasn’t worked well in years. We do also have tall ceilings, but we were not utilizing the vertical real estate as smartly as we could have.
There were many things that frustrated us about our kitchen. I could never find anything when I needed it. Drawers and cabinets were bursting. The energy of the kitchen felt dark, congested, and chaotic. If I was going to work from home, we needed a change. Here’s what we did.
When we first moved in, the kitchen was painted dark gray. It was so depressing! Within the first year, we painted it Stonington Grey, which is a lighter shade of gray. We liked it better at first, but as time went on, we felt that our kitchen could still be so much brighter. The first thing we decided to do was lighten it all the way up by painting it White Dove (can you tell I like Benjamin Moore paints?). It’s amazing what a coat of paint can do. The spirit of the room was immediately lifted. Next, we need to figure the organization part.
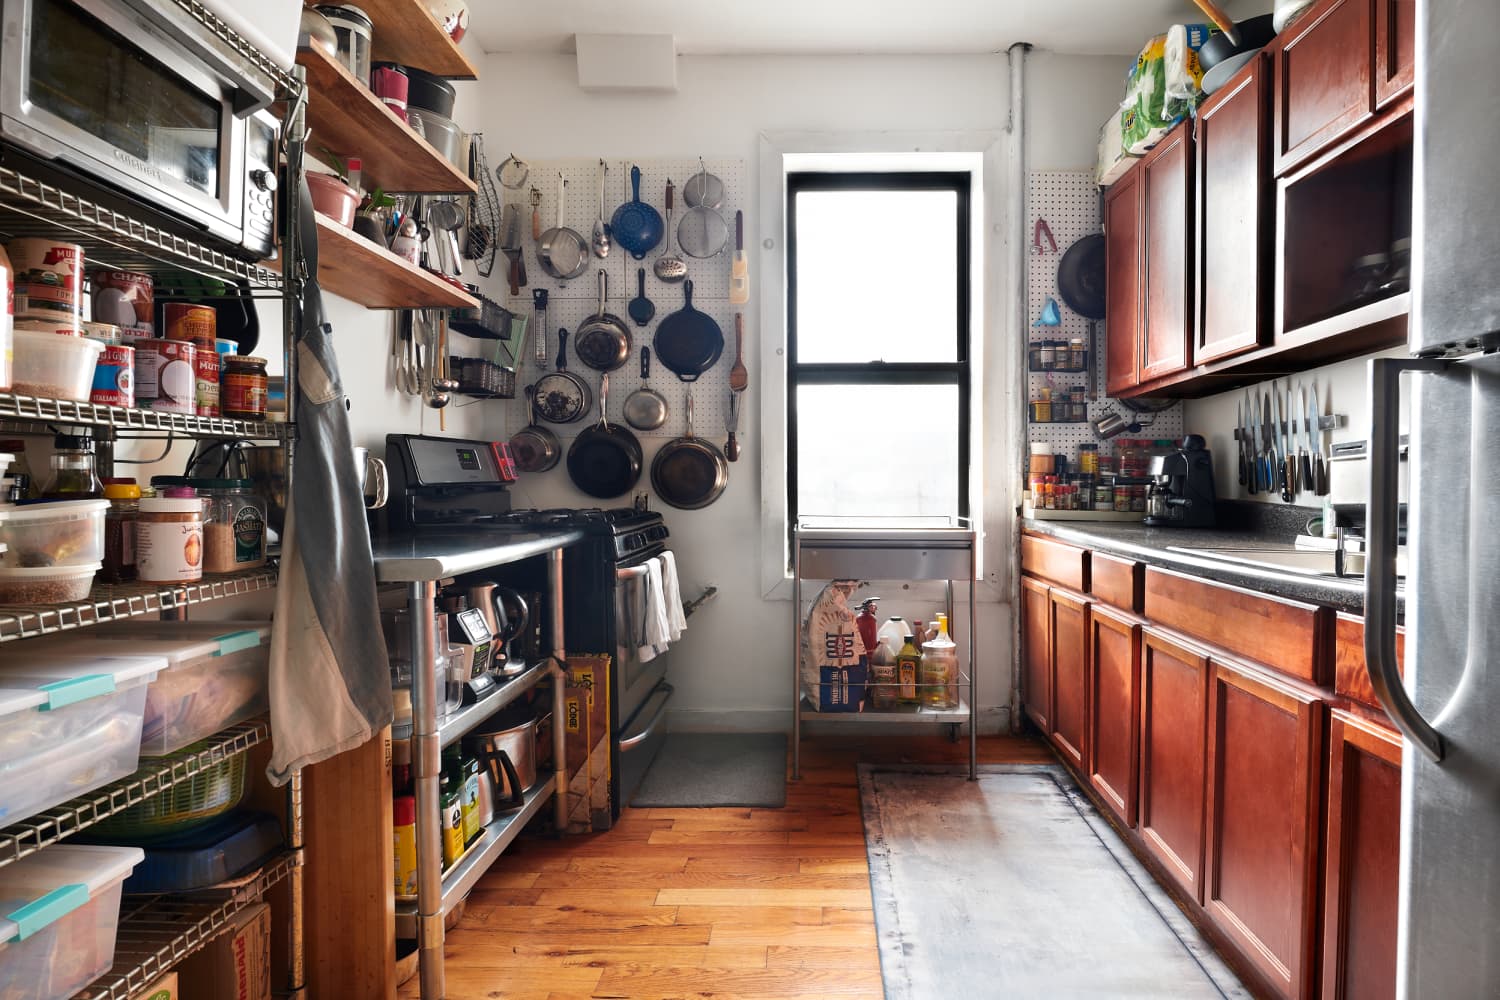
2. We installed pegboards.
As a recipe developer, food stylist, and former restaurant cook, I have a ton of tools. I own multiple sets of tongs, ladles, strainers … and I use them all regularly. I needed my tools to be accessible. Again, our apartment has tall ceilings (9 feet!) and we were not utilizing that vertical real estate at all. I took a cue from Queen Julia Child’s famous Provence kitchen and decided that the best way to organize my tools in a way they were easily accessible was to put up pegboards. We found the pegboards with the dimensions that we needed online at Wayfair and Home Depot.
We put up the Wayfair pegboards on the wall area that surrounds my stove, and purchased the hooks and accessories that fit our needs. I put the tools I use the most — including fish spatulas, heat-proof rubber spatulas, wooden spoons, tongs, skillets, and saucepans — in the lower areas. Now, they’re super accessible and right there when I needed them. I used the middle of the pegboard and the very top for stuff that I use often but not as often. Oh, and I got these baskets to hold the spices that I most frequently use.
The Home Depot pegboard went up on the opposite side of the kitchen and I used that for more cookware (my large nonstick, and my extra-large sauté pan). I added more baskets to hold my lesser-used spices and some random tools (like my cherry pitter and steamer cup to my espresso machine).
Moving my tools and cookware to the wall opened up so much space in my drawers and on the wire shelving racks. My drawers were now decluttered and easy to organize. I’m proud to say that I can officially see every tool in each drawer when I open them and no longer have to rummage around to find what I need.
3. We added more counter space.
The next problem to solve was the counter space situation. I needed more counter space — and I needed space to put all my appliances. I remembered the stainless steel work tables from my time working in restaurants. This table would not only double my counter space, but also provide me with some extra shelves. Another bonus to this table is that it has adjustable legs. So if your floor isn’t level like mine, you can adjust the legs to make sure your countertop is level. Keep in mind that you’ll have to purchase an undershelf for the table to have all that storage space. It’s a bit pricey, but this table will last forever and can come with me if we decide to move.
Buy: Deluxe Series Work Table, $553.14 at Hotel Restaurant Supply
4. We hung up a wall shelf.
Next was the vertical wall space above the stainless steel table. I tend to be a pretty function-forward person, and I knew I wanted to bring in an aesthetically pleasing piece to the room to give it a homey balance. I have a few Dutch ovens and a number of vintage items and sweet things I’ve picked up along my travels that I wanted to display. We picked up this shelving unit from West Elm. The L-Beam Shelf is sturdy enough to hold all those items while also adding a visually pleasing element to the room.
Buy: L-Beam Shelf, $250 at West Elm
I put bins on the lowest shelves with my remaining tools like my whisks, fancy wooden spoons, Microplane, and tweezers. And then I filled the rest of the shelf space with items close to my heart and a plant to bring some life into the room.
Remember those IKEA racks? Reorganizing those racks was the final stage. I removed anything that didn’t really belong in the kitchen (like the tool box and the drill!) and moved those things into better homes. This freed up three (!!!) shelves; I placed my salad spinner and glass bakeware on the shelf. I still needed a safe place to keep excess noodles, grains, nuts, and spices, so I picked up some Sterilite storage bins that happen to fit the shelves perfectly. Bonus: The bins clip shut, keeping the items inside safe from flour weevils and other pests. Each bin is organized neatly and by category, so I know exactly where everything is and how much I have.
Buy: Sterilite Deep Clip Box, $39.79 for four
I also got rid of my old oversized microwave. We thought about not having one at all, but there are just some times when you can’t beat the convenience of one. We didn’t need anything heavy-duty and I definitely wasn’t trying to take up more counter space. After doing some research on small microwaves, I purchased a highly rated Whirlpool Countertop Microwave. I now keep that stored on top of the fridge.
Before, our kitchen made us feel a little topsy-turvy and we definitely didn’t enjoy the space as much as we could have. Now my husband and I stand and stare lovingly at our kitchen and give each other a pat on the back for all the hard work we put in. Our kitchen is now a source of joy and a room we want to spend time in. Good thing, too, because it’s my job to be in there.
tinyurlis.gdv.gdv.htu.nuclck.ruulvis.netshrtco.detny.im
مقالات مشابه
- ایالات متحده قول داده است که "آینده ای یورو-آتلانتیک برای اوکراین" بسازد: سیاست: جهان: Lenta.ru - BB-CNTV
- شرکت صادرات و واردات کالاهای مختلف از جمله کاشی و سرامیک و ارائه دهنده خدمات ترانزیت و بارگیری دریایی و ریلی و ترخیص کالا برای کشورهای مختلف از جمله روسیه و کشورهای حوزه cis و سایر نقاط جهان - بازرگانی علی قانعی
- سلامت: علم و فناوری: Lenta.ru - BB-CNTV
- شرکت صادرات و واردات کالاهای مختلف از جمله کاشی و سرامیک و ارائه دهنده خدمات ترانزیت و بارگیری دریایی و ریلی و ترخیص کالا برای کشورهای مختلف از جمله روسیه و کشورهای حوزه cis و سایر نقاط جهان - بازرگانی علی قانعی
- 7 خلاق اشکال-دافع محصولات برای فضای خود را در فضای
- بهترین توصیه میتوانید همیشه دریافت درباره مواد شیمیایی
- 2.50 $مخلوط ادویه که من قرار داده و عملا همه چیز را
- شرکت صادرات و واردات کالاهای مختلف از جمله کاشی و سرامیک و ارائه دهنده خدمات ترانزیت و بارگیری دریایی و ریلی و ترخیص کالا برای کشورهای مختلف از جمله روسیه و کشورهای حوزه cis و سایر نقاط جهان - بازرگانی علی قانعی
- در روسیه در سال 2022 قوانین در اختیار داشتن سلاح تغییر می کند: جامعه: روسیه: Lenta.ru
- شرکت صادرات و واردات کالاهای مختلف از جمله کاشی و سرامیک و ارائه دهنده خدمات ترانزیت و بارگیری دریایی و ریلی و ترخیص کالا برای کشورهای مختلف از جمله روسیه و کشورهای حوزه cis و سایر نقاط جهان - بازرگانی علی قانعی